
Documentation, Sources, Binaries, Links, Examples, Contributions

|
Content
|
Example: Simulating MMIX on MMIXThis example takes a suggestion from Donald Knuth (MMIX-PIPE, §1) :
Taking one step back, this example does not simulate mmmix (the pipeline simulator) but mmix (the instruction level simulator). The former is possible as well; the process of compiling and running the pipeline simulator is, however, more complicated and for the sake of simplicity, this example uses the instruction level simulator. In general, all you need to do this is a C compiler for MMIX, and further below, we explain where to get the GNU C Compiler as a crosscompiler either for Linux or Win32, and how to run it to produce mmix.mmo. Here we run the code on a version of MMIX that runns on a Virtual Motherboard. In this setting, you can not only run MMIX as an mmo file, but also use a high-level debugger (gdb or insight) to debug programs written in C, C++ or other languages on the source level. This is an indispensable necessity for developing programms for MMIX in higher level languages. If you would just like to see this example running (using here the Virtual Motherboard based incarnation of MMIX), download
and unpack it into an empty directory of your choice. In the following we give a detailed description on how to run the example and explain what it does. We will explain how to build the programs mentioned from the respective source files in next section. Running MMIX on MMIX
When starting, the motherboard will read the file default.vmb to get its configuration parameters. The parameter file will also instruct the motherboard to start secondary devices. In this case, the motherboard starts ROM, RAM, Screen, Keyboard and last not least the MMIX CPU. The devices (if conforming to the virtual motherboard standard) will read the default.vmb file as well to get properly initialized. For instance, the devices take the address where they are mapped into the physical address space and the interrupts they might produce (or receive) from this configuration file. The ROM device will need an image-file containing - byte for byte - the ROM content. In this example, the ROM content is contained in the file bios.img and similarly the file disk.bin contains - block for block - the disk image for the disk device. If you know the original instruction level MMIX simulator, the MMIX CPU device will look very familiar to you. In fact you use it just like the former, mainly the memory simulation has been replaced by the virtual motherboard. In this example, the MMIX CPU is started form the motherboard with the command line mmix -i -O mmix.mmo -i hello.mmo So we run mmix with the parameters -i -O mmix.mmo -i hello.mmo The -i option should be familiar. We run mmix in interactive mode. The -O option is new. We enable tracing inside the operating system, that is at negative virtual addresses. Then comes the object file mmix.mmo which was produced with the GNU C compiler from mmix-arith.c mmix-io.c mmix-sim.c and abstime.h, which in turn were produced with ctangle from the corresponding .w files. The MMIX CPU will not notice anything special about this program but load it into memory and run it like any other program presented to it as an mmo file. The rest of the command line "-i hello.mmo" are passed as arguments to the just loaded mmo file at the beginning of the Pool segment. Now that the system has started, the devices will wait that you turn on the virtual power. So
The system starts running and in the MMIX window you will see the familiar mmix> prompt. Hit the return key to execute the first instruction. What you see is the MMIX CPU booting from the first negative address #8000 0000 0000 0000. It will set up registers like rT, rTT, or rV taking instructions from the ROM device, which is mapped at physical address zero. To trace the instructions all the way through the boot process to the start of the Main program might be a bit time consuming. Especially initializing the hard disk device is quite a lot of (unreadable) assembly code, which was generated by the GNU C compiler form a collection of files bound into a library and linked with the rest of the BIOS code to produce the bios.img file that now resides in ROM. For convenience, the MMIX simulator sets an execute breakpoint at the start of the Main program (type "B" at the mmix> prompt to see all breakpoints). So type "c" - for "continue" - to skip over all the details of an MMIX machine booting from ROM and the CPU will stop at the first instruction of mmix.mmo. 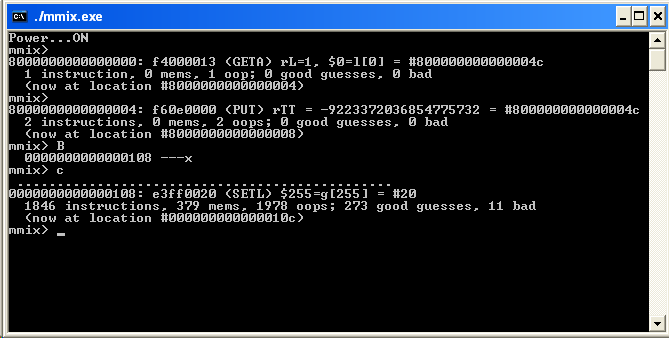
Again, it is possible to step instruction for instruction through the whole program, however, compiler output is rarely nice to look at. It calls for tracing with a high level debugger on the source level, which is possible, but requires a slightly different setting (e.g. using standard ELF files, containing debug information, instead of MMO files) explained in a separate section below. So hit "c" again to continue with the program. Unlike the original mmix, where output to StdOut appears on the same screen as the debug output from the CPU, the computer you are looking at has a separate screen device, connected to the motherboard as a serial output device implementing a simple UART . The C Compiler has mapped the printf commands of mmix to TRAP 0,Fwrite,StdOut instructions, and the BIOS implements these TRAPs by writing to the screen device. Hence it should not come as a surprise that you see the familiar "mmix>" prompt on the screen. Remember, the mmix.mmo program was started with the -i option. The mmix.mmo program has also used, operating system calls to open the file hello.mmo and load it into memory. But where did the hello.mmo come from? It is inside the disk image-file disk.bin that was loaded into the disk device. The disk device treats the disk image as a long sequence of 512 Byte blocks, that can be read an written by the operation system at will. The operating system contained in the bios.img is linked against a library implementing a FAT32 file system. In turn, the Fopen, Fread, and Fclose TRAPs are calling functions from this library. Without such a library it would hardly be possible to simulate a program like mmix.mmo, which requires file I/O. If you want to modify the disk image, e.g. modify the file hello.mms and create a new hello.mmo, you should read the Instructions to modify a disk image. Next you could type the "h" command for help or simply hit the return key, to execute a single instruction from hello.mmo. Note: you have to type commands to the simulated computer neither into the CPU window nor into the screen window (one doesn't type on CPUs or screens) but of course you have to select the keyboard window and type there. Shouldn't that be the most natural thing? 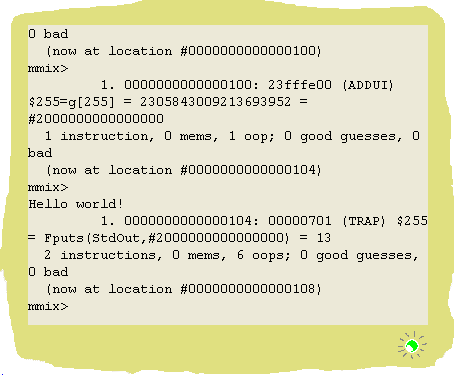
You can easily trace through the whole hello.mmo program, since it has only three instructions. After the final TRAP 0,Halt,0 the program returns to the operating system, where a SWYM 5 instruction ( a kind of software breakpoint) will inform the debugger that the program has halted. Installing the GNU ToolchainTo produce your own C programms that you can run on an MMIX, or to modify existing programms you need not only a C Compiler, you need a whole toolchain. Thanks to Hans-Peter Nilson, the GNU Binutils and the GNU C compiler are available for the MMIX. Thanks to Martin Ruckert a first (alpha) version of the GNU debugger gdb/insight is also available. The process of compiling these from sources is quite complex. It is easier to download and install ready made executables.
Running the Example under the GNU source level debugger "insight"Running the example described above using the GNU debugger requires two things: Obviously, you need the debugger, which commes in two installments: gdb - a command line utility - and insight - a full GUI frontend to gdb - and second you need object files that contain debug information and you need the source files that are refernced from this debug information. If you have not yet installed the GNU toolchain following the instructions in the previous section you must do so now to get gdb and insight together with a whole collection of necessary runtime libraries and initialization files. To get the sources and the elf object files (the native object file format for the GNU toolchain is the "elf "format not the "mmo" format) download the file
This will produce the files bios.elf and mmix.elf, which are the elf counterparts of bios.mmo and mmix.mmo, an initializtaion file for gdb called .gdbinit (yes, the filename starts with a dot) and two subdirectories mmix containing the mmix sources and bios containing the bios sources. Last not least it produces a new default.vmb file containing the configuration for the whole system. The differences between the old default.vmb and the new default.vmb are minor. The later just starts gmmix instead of mmix. The difference between gmmix and mmix beeing that the buildin debugger of mmix is repaced by an interface to gdb. Further the CPU simulator is no longer in charge of loading the application mmix.mmo with all its arguments, instead the gdb debugger knows how to load elf files into memory and how to handle command line arguments. Now you can run the example as before:
The motherboard will not start the debugger itself., because typically you keep your virtual computer sitting in the background, switching power on and starting the debugger with the target program as needed. (Second, starting the insight debuger from the motherboard seemd a bit strange, has timing problems and is not (yet) tested) So open a command window and type mmix-insight --args mmix\mmix.elf -i hello.mmo This will start the debugger. It will read the initialization file .gdbinit, which contains the commands target remote :2331 Generating the Example Files from SourcesAgain you need the GNU toolchain installed to produce the elf executables form the sources.
Building the elf executables and image files from sources is automated using Makefiles. To build bios.elf and bios.img just oben a terminal window, change into the bios source directory created in the previous section and type the command make. Building mmix.elf is simmilar. You need however one further tool
to convert .w files into .c files. Download the file using the link above and install it either into the mmix subdirectory containing the sources or into the mmix/bin directory containing all the other executables, which should be on your search path anyway. Having completed these preparations, change to the mmix subdirectory and type the command make. If you want a summary of what make is doing or want to do the generation step by step, read on. Generating bios.elfOn the toplevel, we have a couple of assembler files, the root file bios.s, a file with jumptables (tables.s) for the different dynamic and forced traps contained in the files dtraps.s and ftraps.s Then a file terminal.s containing low level routines for input and output to screen and keyboard, a diskio.s file providing low level access to the disk device and a file pagetab.s, that is created by a script, containing the page tables (This version of the BIOS just keeps fixed pagetables in ROM). They are assembled using the gnu assembler. By default the assembler will expand single instructions like BZ, JMP, or GETA that handle external adresses into multiple instructions to cover cases where the linker decides that the adress would otherwise not fit into the instruction (3 Byte for a GETA or JMP, 1 Byte for a BZ). To suppress this behaviour especially for the jumptabels, the file is assembled with the -no-expand option.
Next we change to the libfat32 directory. Here we compile the c files to .o files, making shure that the compiler will not use global registers as base adresses (we keep that for the user program, and do not use global registers in the BIOS).
Now we can bind the object files into a library:
last not least we return to the bios-src directory and use the gnu linker/loader to bind the objects files we have assembled together with the library we just created. Finally, we use the objcopy program to convert bios.elf into a binary image file for the ROM device. (objcopy can also be used to make an mmo file from an elf file).
Generating mmix.elfThese are the commands:
First we produce the .c files from the .w files using ctangle. the we use gcc to compile either an elf output file (using the option -melf) or an mmo output file.
|
Please help to keep this site up to date!
If you want to point out important material or projects
that are not listed here, if you find errors or want to suggest improvements,
please send email to
![]()