MMIX Minesweeper Example

Content
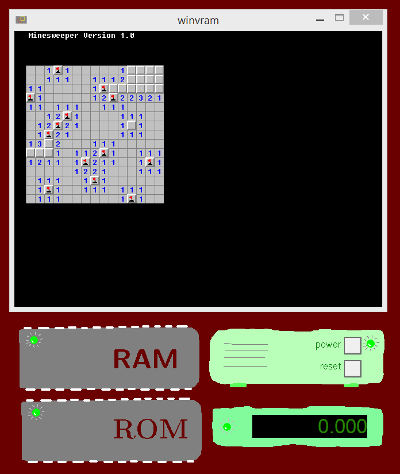
MMIX Minesweeper Example (Windows only)
This is the well known minesweeper game running on MMIX and VMB. Besides the motherboard, ROM (containing the BIOS), RAM (for the application code and data, including the bitmaps) and graphics card (with mouse device and video RAM), it features the timer device, using it to initialize the random number generator with the current time.
The files minesweeper.mms and bios.mms contain the necessary MMIX code. The file default.vmb contains the VMB configuration. Use mmixal to get minesweeper.mmo and bios.mmo from the source files, and use mmoimg to get bios.img from the bios.mmo file.
Now start the whole system by a double click on default.vmb and switch on power. Click with the mouse on the minefield and see how lucky you are.
Some Notes on the Implementation
The minesweeper program uses quite a few TRAPs to access the available devices.- To start with a simple one: The TTimeOfDay TRAP
reads the a special register from the timer device giving the
number of seconds since midnight. This number is then used to
initialize the random number generator. This way you will always get
new locations for the mines.
- Just a little more complex is the MWaitEvent TRAP.
Similar to the TRAP just described, it simply returns a device register
giving the caller the mouse status. But before the TRAP can return, it
waits in a loop for a mouse interrupt by polling the rQ register.
- The TRAPs GSetPos, GSetTexTColor, and GPutChar
are simple too.
They write values, passed using register $255, to an appropriate register
of the graphics card.
- The GPutStr TRAP is similar to the GPutChar TRAP
but it features a loop over all characters until the terminating zero byte
is found.
- The most interesting TRAP is GBitBltIn.
It performs a bit-block-transfer from main memory (RAM or ROM) to
the video RAM using the DMA capabilities of the graphics card.
The graphic-card has registers for width and height of the bitmap
and for the x and y coordinates of the target position.
To set these registers is straight forward.
A bit more complex is setting the source address of the bitmap. The graphic-card works with physical addresses, where as the MMIX CPU works with virtual addresses. Hence, a translation from virtual to physical addresses is required. This translation is normally done in "hardware"; here, however, this translation must be done in software. The function virt2phys, part of the BIOS, is looking up the required translation in the page table.
A more technical problem is getting the source bitblocks into MMIX memory. More recent versions of mmixal know about the FILE pseudo-instruction allowing you to include any (binary) file as part of an MMIX object file. Further, more recent versions of the graphic-card can directly read and load .bmp files to the video memory. The solution used here, is a bit more basic. You can use a special program (for example the "Export to C" feature of GIMP) to convert the bitmap into a textual representation as hexadecimal red green and blue values. Then you can use an editor, to bring the data bitmap files (empty.bmp, flag.bmp, mine.bmp, exploded.bmp) into MMIX source format. (See the file bitmaps.mms) Here each pixel is represented as one TETRA byte, where the high byte is ignored and the next three byte are the red, green, and blue values of the pixel. The code is then finally included in the minesweeper source code.